Showing posts with label tips. Show all posts

Facebook dynamic multi-product ads is what eCommerce stores needed


How can Facebook dynamic multi-product ads affect eCommerce?


Wizard-guide-to-Facebook-dynamic-multi-product-ads


You might have seen some Facebook multi-product ads yourself as well.


Facebook-dynamic-multi-product-ads

Facebook-dynamic-multi-product-ads


What is the main difference between the standard Facebook ads? Now you have the option to promote a number of unique products and their features in a carousel kind of ad.
 
Now if you have an e-shop that’s your hard sales breakthrough. You can select some of your finest products, TARGET the specific persons you want and then wait.
 
You could of course have a post with the product you are promoting and boost it but is that the same thing? The user will see at least 3 multi-product ads as an impression. They might see something they like in it. If the price is right they will click. Simple CPC (cost per click).
 
That way you can show your product variety, be very specific, extremely cost effective and create an awareness that can be quite product oriented.
 
That way you grasp the attention of a potential buyer that will view your variety and increase your sales! All that with an average CPC around 0, 05€. You get to show off your catalogue (or a portion of it) with extremely low cost.
 
Facebook has created a very powerful sales tool that may span across the smallest e-shop up to the biggest eCommerce retailer.
 
It’s all about relevance and perception if you ask me. Facebook algorithm nowadays is so smart and by giving you the chance to show more than one ads in the same space as one is the smart sales move to do. All because of relevance. When you win the relevance game the next thing to do is become even more effective.
 
Say you have an e-shop. You could go around with awareness ads promoting your stuff in general or you could go for a very specific ad that actually might not grasp the audience. Now Facebook dynamic multi-product ads change the whole set. They give you options in virtually the same cost or less.

You have a catalogue of products you want to show. Same goes for the user. They want to see the variety some times. But if I see what I want to buy on one specific ad then you have my interest. If the price is right I might even buy on impulse!
 
Some may say that this is the win move from Facebook on Google. I would say we have to wait. But to be honest, Facebook ads do manage to target way more correctly than a GDN ad. Google search might still be very effective, but the experience is not a much dynamic as a Facebook ad and considering the complexity of ads and the potential cost of specific words, then it’s a no go for a small eCommerce company.
 
In other words the definitive winner move nowadays for small eCommerce businesses is Facebook. I don’t say that you should not invest in Google. On the contrary. Your mix needs to be wide in order to reach wider in terms of customers. What I am saying however is that you should probably reconsider where to spend your budget in terms of mix.


post signature

Best SEO tips for blogger (and it's free)


Every ambitious blogger desires one thing. For people to see his articles and perhaps gain some revenue out of it. 


So many people around the world go out and try to find ways to increase their SEO (search engine optimization). So what is SEO to begin with? Basically is how often you will appear on search results on Google and other search engines.

Unfortunately lots of people get scummed and get to pay massive amounts of money to "increase" their search engine visibility. So this article is something I created on my own. It's not something you will find all over the web. 


It's the do's and dont's in SEO for blogger. 


SEO-guide-tips-wizard

Have in mind you can use all of these tips in anything you want to do online. So should we begin with with the dont's?


1. Metatags and specific keywords in the code do nothing.


You might have heard of the power of metatags. You put some specific words on the backend of your blogger blog and magically you get more pageviews. This is not true. Metatags are more like a "guide" of what the blog might contain, but it will never bring the desired traffic on your blogger blog.


2. SEO Companies.


There are still SEO companies around the world selling you SEO optimized blogs etc. Do not spend a penny on this. It's nothing you cannot personally do, and nothing that will give you any traffic of importance. Google has stopped promoting words for SEO. Google promotes content in the proper context with words as a guide.


3. Backlinks. 


Supposedly backlinks is an effective way to build traffic on your blog. There are two kinds of backlinks. Those you find free and those you have to pay for in order to gain access to them. Do NOT ever use any kind of backlinks for your blog. It will most likely reduce your traffic, than get you any traffic at  all. Google as I said before wants traffic to be fair. Google wants it's users to find what they actually are looking for and not some crap websites. For that reason backlinks will never help you.

Now let's see what you can do to give an increased SEO value on your blog.


First of all. Remember to be patient. Rome was not built in a day. Content/Context SEO takes time to build (mostly because it takes time to index), but after it is built, it's precious and it will not be gone. 


1. Words.


When we are talking about a blog, it's mostly articles right? How will you get Google to show your article on Google? You will need to show you actually try. You don't just blog to make money. You need to show that your content has value. One way to prove that is how many words is an article. Based on my experience, do not go below 500 words. Go for at least 500 to 1000. That will show Google that you mean business. Plus you will get space to increase your density.


2. Words density. 


Now that is important. Google recognizes keywords inside your content. Based ALWAYS on your context, it scans your words density. Meaning how many times a relevant word appears. But be careful. Don't just go around spam one word. This will not help. As I said, context is crucial when it comes to this. 


3. Images.


Images nowadays have an important SEO value. But be careful. As I said before. Do not use random pictures in hope that you will get more traffic. You won't. Do not forget. When you are using an image, Google doesn't know what the image contains. You will have to name it. In blogger you can do it like this. 

Just go on your image while editing and click on properties.


4. Helpful websites where you can spread your content.


Personally I do not use many. I mainly use websites that can give added value to whichever content I am using. For that reason I use Pinterest for the images. You cannot possibly imagine how much traffic my blog gets from Pinterest. Other websites can be Stumbleupon (works amazingly with a bit of luck and GOOD content), Digg, Scoop.it, Tumblr and Delicious. Just by having your articles there can be helpful.


5. Webmaster tools.


There are so many bloggers that do not use the webmaster tools and it's such a shame. It's a free tool provided by Google that actually lets you index your articles much faster and give them value. 


Remember folks, I am here to give you a personal evaluation and help for your blog, if you need any. 


Leave a comment or just use the contact form and I well get to you.

I hope this article helped. I sure hope I could have read something like that when I began blogging.


post signature

How to add floating Facebook like box widget for Blogger


Having a Floating Facebook Like Box can help get more Facebook likes and make it easier for you to communicate to your fans and get some attention. 


Social media are needed a lot right now so here is how to do it really fast. 


Let me just say its a widget so you won't have to make any change in the template.


floating facebook like box


So let us start.


1. Login to Blogger account and go to Layout. 


2. Click on add gadget.

floating facebook like box


3. Choose to add HTML/JavaScrit

floating facebook like box

4. Copy the following code 

floating facebook like box
<script src="https://ajax.googleapis.com/ajax/libs/jquery/1.6.1/jquery.min.js" type="text/javascript">
</script>
<script type="text/javascript">
//<!--
$(document).ready(function() {$(".floatinglikebox").hover(function() {$(this).stop().animate({right: "0"}, "medium");}, function() {$(this).stop().animate({right: "-250"}, "medium");}, 500);});
//-->
</script>
<style type="text/css">
.floatinglikebox{background: url("https://blogger.googleusercontent.com/img/b/R29vZ2xl/AVvXsEiR9ivyv9eNrDqiKuDzey0SmlA_1OHCxBJL8UJhV1Q4H0s2YBs04P6WYBa-5RCmFuLM5aos2z4qut9Egj2pAVk4Qjn5IWbZhYUyF6ATnTNJjxJwVeKAccJVdQMFxmpJUEMos8bcDAK8GWg/s1600/floatingfb.png") no-repeat scroll left center transparent !important;display: block;float: right;height: 270px;padding: 0 5px 0 40px;width: 245px;z-index: 99999;position:fixed;right:-250px;top:10%;}
.floatinglikebox div{border:none;position:relative;display:block;}
.floatinglikebox span{bottom: 10px;font: 10px tahoma,verdana,arial,sans-serif;position: absolute;right: 6px;text-align: right;z-index: 99999;}
.floatinglikebox span a{color: #808080;text-decoration:none;}
.floatinglikebox span a:hover{text-decoration:underline;}
</style><div class="floatinglikebox" style="">
<div>
<iframe src="//www.facebook.com/plugins/likebox.php?
href=https://www.facebook.com/wizardofdork&amp;width=251&amp;height=270&amp;colorscheme=light&amp;show_faces=true&amp;border_color=%23cccccc&amp;stream=false&amp;header=false&amp;" scrolling="no" frameborder="0" style="border:none; overflow:hidden; width:251px; height:270px; background:#fff;" allowtransparency="true">
</iframe></div></div>

5. Simply replace the marked page with yours.


And that is all. You have successfully installed your own floating Facebook Like Box for Blogger!

Find out more Blogger tips and SEO tools here:

How To Remove Blogger Navbar

How to remove powered by blogger

How to make a signature for your blog posts on blogger

How to remove: Subscribe Post to Atom for Blogger

How to create an about us page on Blogger

post signature

How to create custom contact form page for Blogger


Having a custom contact form on Blogger on a separate page not only makes your blog look professional but it also makes it easier for your viewers to contact you.


wizard contact form


I am going to show you how to make it in very easy steps. There are other ways too, but the way I've found out is really really fast and you don't need to edit the template or anything.


So let us start. 


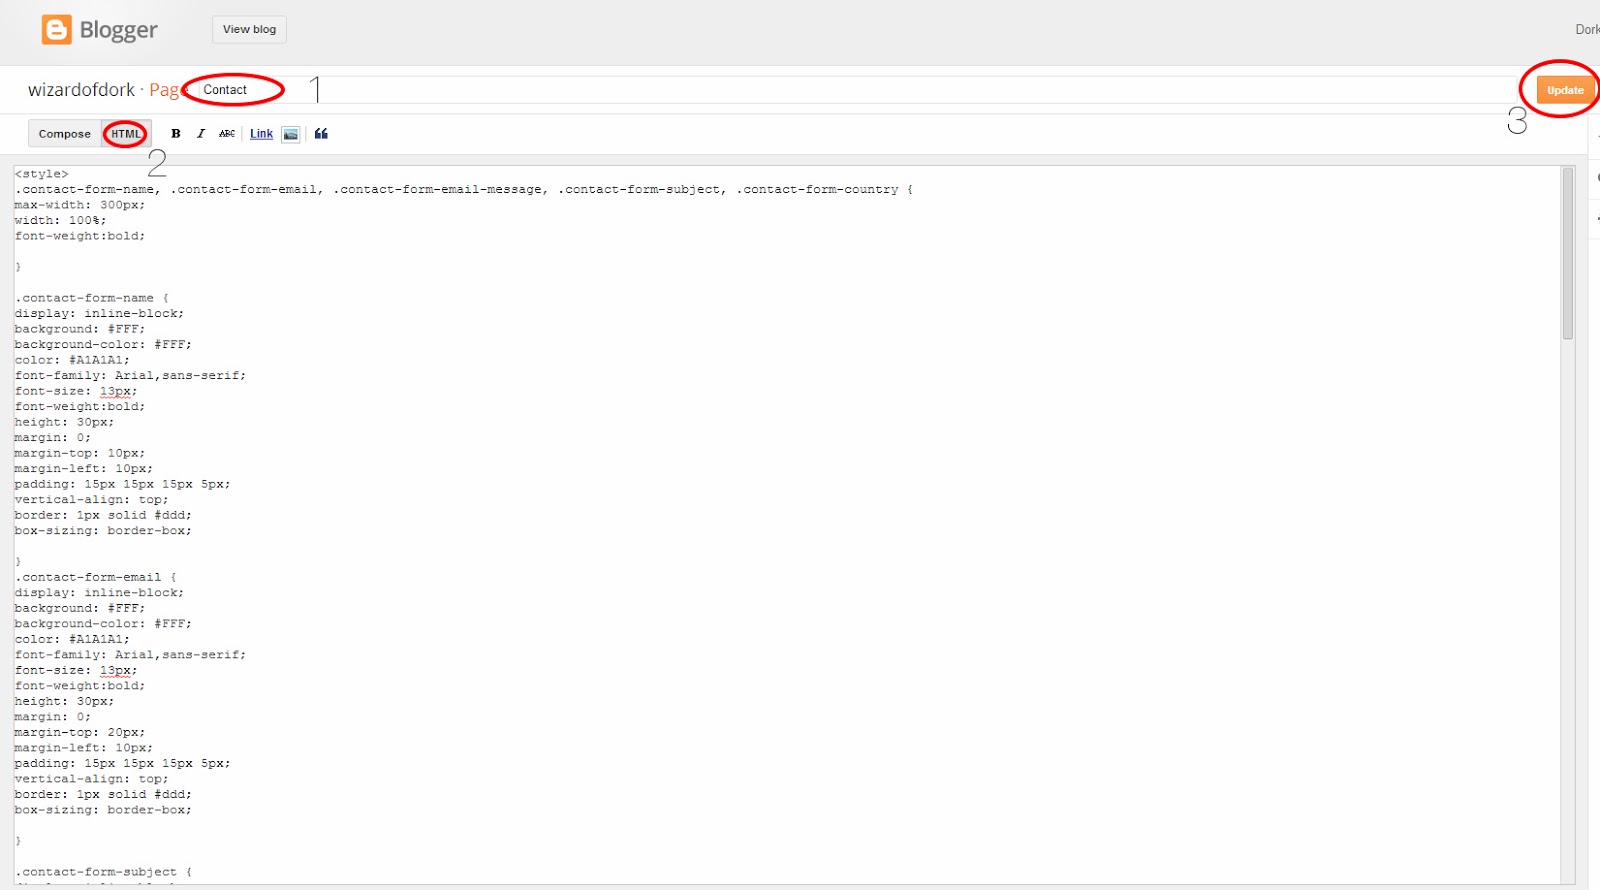
1. Log in to your Blogger account and go to Pages.

2. Click on new page. 


create custom contact form page for Blogger

3. Select a title for the post. I choose contact.

4. Copy and paste the html below on the html region of the post. 


create custom contact form page for Blogger


<style>
.contact-form-name, .contact-form-email, .contact-form-email-message, .contact-form-subject, .contact-form-country {
max-width: 300px;
width: 100%;
font-weight:bold;
}
.contact-form-name {
display: inline-block;
background: #FFF;
background-color: #FFF;
color: #A1A1A1;
font-family: Arial,sans-serif;
font-size: 13px;
font-weight:bold;
height: 30px;
margin: 0;
margin-top: 10px;
margin-left: 10px;
padding: 15px 15px 15px 5px;
vertical-align: top;
border: 1px solid #ddd;
box-sizing: border-box; 
}
.contact-form-email {
display: inline-block;
background: #FFF;
background-color: #FFF;
color: #A1A1A1;
font-family: Arial,sans-serif;
font-size: 13px;
font-weight:bold;
height: 30px;
margin: 0;
margin-top: 20px;
margin-left: 10px;
padding: 15px 15px 15px 5px;
vertical-align: top;
border: 1px solid #ddd;
box-sizing: border-box;
} 
.contact-form-subject {
display: inline-block;
background: #FFF;
background-color: #FFF;
color: #A1A1A1;
font-family: Arial,sans-serif;
font-size: 13px;
font-weight:bold;
height: 30px;
margin: 0;
margin-top: 20px;
margin-left: 10px;
padding: 15px 15px 15px 5px;
vertical-align: top;
border: 1px solid #ddd;
box-sizing: border-box;
} 
.contact-form-country {
display: inline-block;
background: #FFF;
background-color: #FFF;
color: #A1A1A1;
font-family: Arial,sans-serif;
font-size: 13px;
font-weight:bold;
height: 30px;
margin: 0;
margin-top: 20px;
margin-left: 10px;
padding: 15px 15px 15px 5px;
vertical-align: top;
border: 1px solid #ddd;
box-sizing: border-box;
}
.contact-form-email:hover, .contact-form-name:hover{
border: 1px solid #bebebe;
box-shadow: 0 1px 2px rgba(5, 95, 255, .1);
padding: 15px 15px 15px 5px;
}
 .contact-form-email-message:hover {
border: 1px solid #bebebe;
box-shadow: 0 1px 2px rgba(5, 95, 255, .1);
padding: 10px;
} 
.contact-form-email-message {
background: #FFF;
background-color: #FFF;
border: 1px solid #ddd;
box-sizing: border-box;
color: #A1A1A1;
display: inline-block;
font-family: arial;
font-size: 12px;
margin: 0;
margin-top: 20px;
margin-left: 10px;
margin-bottom: 10px;
padding: 10px;
vertical-align: top;
max-width: 500px!important;
height: 120px;
border-radius:4px;
} 
.contact-form-button {
cursor:pointer;
height: 30px;
line-height: 30px;
font-weight:bold;
border:none;
} 
.contact-form-button {
display: inline-block;
zoom: 1; /* zoom and *display = ie7 hack for display:inline-block */
*display: inline;
vertical-align: baseline;
margin: 0 10px;
outline: none;
cursor: pointer;
text-align: center;
text-decoration: none;
font: 14px/100% Arial, Helvetica, sans-serif;
padding: .5em 2em .55em;
text-shadow: 0 1px 1px rgba(1,1,1,.3);
-webkit-border-radius: .2em; 
-moz-border-radius: .2em;
border-radius: .2em;
-webkit-box-shadow: 0 1px 2px rgba(1,1,1,.3);
-moz-box-shadow: 0 1px 2px rgba(1,1,1,.3);
box-shadow: 0 1px 2px rgba(1,1,1,.3);
}
.contact-form-button:hover {
text-decoration: none!important;
border: none!important;
}
.contact-form-button:active {
position: relative;
top: 1px;
} 
</style> 
<div class="form">
<form name="contact-form">
<input class='contact-form-name' id='ContactForm1_contact-form-name' name='name' value="Name" size='30' type='text' onblur='if (this.value == &quot;&quot;) {this.value = &quot;Name&quot;;}' onfocus='if (this.value == &quot;Name&quot;) {this.value = &quot;&quot;;}' />
<p></p> 
<input class='contact-form-email' id='ContactForm1_contact-form-email' name='email' value="Email ID"  size='30' type='text' onblur='if (this.value == &quot;&quot;) {this.value = &quot;Email ID&quot;;}' onfocus='if (this.value == &quot;Email ID&quot;) {this.value = &quot;&quot;;}'/>
<p></p>
<input class='contact-form-subject' id='ContactForm1_contact-form-email' name='subject' value="Subject"  size='30' type='text' onblur='if (this.value == &quot;&quot;) {this.value = &quot;Subject&quot;;}' onfocus='if (this.value == &quot;Subject&quot;) {this.value = &quot;&quot;;}'/>
<p></p>
<input class='contact-form-country' id='ContactForm1_contact-form-email' name='Country' value="Country"  size='30' type='text' onblur='if (this.value == &quot;&quot;) {this.value = &quot;Country&quot;;}' onfocus='if (this.value == &quot;Country&quot;) {this.value = &quot;&quot;;}'/>
<p></p>
<textarea class="contact-form-email-message" id="ContactForm1_contact-form-email-message" name="email-message" onblur="if (this.value == &quot;&quot;) {this.value = &quot;Leave Your Message..&quot;;}" onfocus="if (this.value == &quot;Leave Your Message..&quot;) {this.value = &quot;&quot;;}" value="Leave Your Message.."></textarea>
<p></p>
<input class='contact-form-button contact-form-button-submit' type='reset' value='Clear'/>  
<input class="contact-form-button contact-form-button-submit" id="ContactForm1_contact-form-submit" type="button" value="Send" />
<br />
<div style="max-width: 500px; text-align: center; width: 100%;">
<div class="contact-form-error-message" id="ContactForm1_contact-form-error-message">
</div>
<div class="contact-form-success-message" id="ContactForm1_contact-form-success-message">
</div>
</div>
</form>
</div>


5. Click publish. 


That is it. You have successfully created a custom contact form page for Blogger.


Find out more Blogger tips and SEO tools here:

How To Remove Blogger Navbar

How to remove powered by blogger

How to make a signature for your blog posts on blogger

How to remove: Subscribe Post to Atom for Blogger

How to create an about us page on Blogger

How to create custom contact form page for Blogger

How to add floating Facebook like box widget for Blogger


post signature

How to create an about us page on Blogger


This is a very easy and effective way to make your blog look more professional.


wizard about page

You only need to create a page. 


1. Log in to Blogger>Pages


2. Select new page. 


create an about us page on Blogger


3. Select a title. It is also going to be the link.

4. Start writing and putting pictures on the compose area. 


5. When you are done click publish. 

create an about us page on Blogger

That's it. You have successfully created an about us page for your blog.

Find out more Blogger tips and SEO tools here:

How To Remove Blogger Navbar

How to remove powered by blogger

How to make a signature for your blog posts on blogger

How to remove: Subscribe Post to Atom for Blogger

How to create an about us page on Blogger

How to create custom contact form page for Blogger

How to add floating Facebook like box widget for Blogger


post signature

How to remove shadow border from blogger posts


This is a very easy way to remove the annoying shadows from your blog posts. 


Perhaps when you began with your blog you didn't care about it but now you've noticed now important it is for the aesthetics of the blog. So in 6 very easy steps.


1. Log in to Blogger>Template


2. Click edit HTML

remove shadow border from blogger posts


3. Backup your template


4. With CTRL + F on the code search for something like:

remove shadow border from blogger posts


.post-body img, .post-body .tr-caption-container, .Profile img, .Image img,
.BlogList .item-thumbnail img {
 padding: $(image.border.small.size);
 background: $(image.background.color);
 border: 1px solid $(image.border.color);

 -moz-box-shadow: 1px 1px 5px rgba(0, 0, 0, .1);
 -webkit-box-shadow: 1px 1px 5px rgba(0, 0, 0, .1);
 box-shadow: 1px 1px 5px rgba(0, 0, 0, .1);
}

5. You need to replace the whole thing with: 


.post-body img, .post-body .tr-caption-container, .Profile img, .Image img,
.BlogList .item-thumbnail img {
  padding: none !important;
  border: none !important;
  background: none !important;
  -moz-box-shadow: 0px 0px 0px transparent !important;
  -webkit-box-shadow: 0px 0px 0px transparent !important;
  box-shadow: 0px 0px 0px transparent !important;


6. Click save template. 


That's it! You have successfully removed shadow borders from your blogger posts.

Find out more Blogger tips and SEO tools here:

How To Remove Blogger Navbar

How to remove powered by blogger

How to make a signature for your blog posts on blogger

How to remove: Subscribe Post to Atom for Blogger

How to create an about us page on Blogger

How to create custom contact form page for Blogger

How to add floating Facebook like box widget for Blogger


post signature

How to remove: Subscribe Post to Atom for Blogger


Primarily the reason for wanting this to go off is mostly for the looks. It takes space and it's not useful since RSS is used mostly. So I'll show you how to remove it fast and easy.


How to remove: Subscribe Post to Atom for Blogger


1. Log in to your blogger account and go to Template>Edit HTML 


How to remove: Subscribe Post to Atom for Blogger


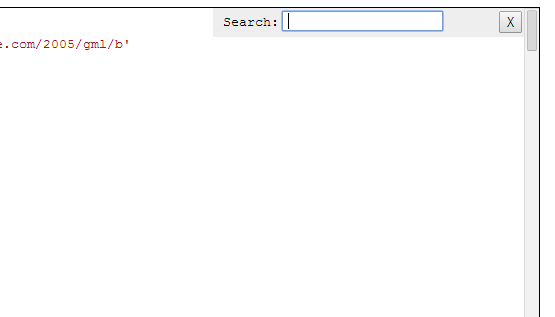
2. Click inside the code area and then press CTRL + F to open the blogger search.


How to remove: Subscribe Post to Atom for Blogger


3. Search for this line <b:include data='feedLinks' name='feedLinksBody'/> 


4. Click save template and you've got it. 


How to remove: Subscribe Post to Atom for Blogger


You have successfully removed Subscribe Post to Atom for Blogger.


Find out more Blogger tips and SEO tools here:

How To Remove Blogger Navbar

How to remove powered by blogger

How to make a signature for your blog posts on blogger

How to remove: Subscribe Post to Atom for Blogger

How to create an about us page on Blogger


post signature
Back To Top